I call these 'Book Blossoms' and unlike regular bookmarks, these don't fall out or get lost.
I came up with the idea when I needed a quick project for a women's retreat at church. The ones we made were a regular bookmark (see the picture at the end of this post) but I always wanted to make an elastic version after seeing my good friend, Linda, use rubber bands as bookmarks.
These also make great little gifts when you need something in a hurry. Not only are they cute, but they are really easy to make. You just need some scraps of material, 1/4" wide elastic, buttons, and some scraps of interfacing.
I've found an old used CD makes a perfect template for a yo-yo. I usually fold a few layers of fabric together and cut several yo-yo's at once. (I wouldn't recommend more than 4 layers, it's not as easy to cut.)
You can either trace and cut with a pair of scissors or use a rotary cutter. Cut a 1" inch square piece of interfacing for each yo-yo. Then round the corners on the interfacing square to make a circle.
Fold over the edge of the fabric circle and finger press as you sew a basting stitch (a basting stitch is just a long running stitch) and gather around the edges. Hmmm. I just noticed how fat my fingers look.
As you sew and gather the stitches, the yo-yo should start to form. Just before you finish the outer edge, slip in an interfacing circle to give the yo-yo some stability. (You can skip the interfacing if you don't have any but it does help.) Yup, those fingers really are fat. Like little white sausages.
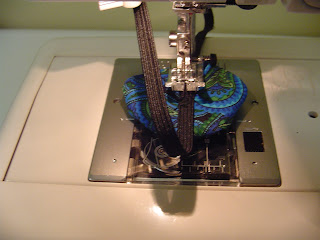
Finish stitching and gathering the outer edges together then draw them in as tight as you can and run a few stitch through the gathers to secure them together. Cut a 14" long piece of elastic. (This is for a standard paperback. If you have a larger book, adjust the length of the elastic accordingly.) Put the ends together to make a band (be sure it's not twisted) and overlap the ends by 1/2" then either hand-sew or zig-zag stitch across the ends to tack them together. Then sew the band to the back of the yo-yo. You can hand sew it but it's much easier to use the sewing machine. Just flip the yo-yo over so that the top is on the bottom and center the band over the back of the yo-yo. Sew it just as you would a button.
You can either sew or hot glue the button on the yo-yo. FYI, the little mat that I'm using with the hot glue gun is a remnant left over from the oven liner that I bought to use in my toaster oven. The liner was made for a regular oven but I trimmed it down to fit the bottom tray of the toaster oven and kept the left over to use with my hot glue gun. Works really great and rolls up for easy storage when you're done. If you don't want to make an elastic bookmark, you can also just use a ribbon to make a regular bookmark. Simply hot glue a piece of ribbon to the back of the yo-yo. Couldn't be easier!


Thanks again for giving each of us one of these Fri. night! Just makes me smile to go pick up my book & see it! It also makes me feel like a loser cause I don't do crafty things, but somebody's got to RECEIVE the gifts!
ReplyDelete