Sunday, September 2, 2012

Design Wall

For one of the quilting classes I'm taking, they encourage taking pictures of your blocks as you complete them and I've noticed several people using what is a called a design wall.  Being a novice quilter, I didn't quite understand it's purpose but as I read the different quilting blogs and forums, I discovered they are very handy for laying out your pieces and making fabric selections.  Sometimes you just need to step back to see how the pieces will work together from a distance.

Ok, having struggled with fabric choices in the past, I thought I'd like to get a design wall too but the cost was prohibitive.  Some of them went as high at $300-$400.   Wa-a-ay out of this girl's budget.  Another popular method was to make one from foam insulation board, covering it in flannel or fleece.  That took up more room than I wanted so I made one using 1-1/8 yard fleece (only because that was what was left on the bolt at the store so they gave it to me at a discount), a cafe rod, and a pair of command strip hooks.   All told I think I have about $10 invested in this.

I washed the fleece and cut the sides even then sewed a casing at the top for the cafe rod.  The hardest part was positioning the command strip hooks to hang the cafe rod (I'm vertically challenged).

Mine is probably a little smaller than the average design wall but I don't really have the room for anything too big.   For me, this works great.  The blocks cling to the fleece without pins and as you can see from the picture, I have room for multiple projects. (The bottom row is for a Christmas table runner and the top two rows are the blocks from quilting class.)  Best of all this is totally portable so I can roll it up and take it with me or take it down and put it in the closet when not needed. 

Have to keep it real here and say that some of my recent projects haven't been exactly perfect, for example, the photo album cover I did today...I put the ric rac on crooked.  (Hey, I had a casserole in the oven and a hungry hubby wanting his lunch so I was a little distracted!)  But the design wall was one project that turned out exactly as planned!  

Wednesday, July 11, 2012

The Happy Hooper

 As a novice machine embroiderer, I have a had a heck of a time mastering the art of hooping.  Then I read somewhere to use a piece of kitchen shelf liner to help hold it steady.  It worked great but I didn't like leaving a piece of shelf liner just lying around.  (Ok, I'm obsessive compulsive...I like everything in it's place and a place for everything.)

So I took a small rotary cutting mat that I had, turned it over, and applied some spray adhesive to it, then placed the shelf liner over it and let it set.  After it dried, I trimmed up the edges and put a set of cross-hairs on it to help me line up my fabric when hooping.


It works great.  Not only does my hoop stay in place while hooping my stabilizer and fabric but when the mat is used for cutting, it stays steady as well.

Sometimes the best solutions are the simplest!


Saturday, July 7, 2012

Wine Glass Dresden Lamp Shade

There's a teeny little fabric store in our teeny little town that I was in recently to purchase an EZ Dresden template ($5.99) for an online quilting class I'm taking.  (Craftsy Block of the Month...it's free and it's fabulous if you are just learning to quilt.)  While I was standing in line waiting to pay for my purchase, I noticed they had a couple of teeny little shades to turn wine glasses into tealight lamps at the check-out table.  They were ok but kind of plain.  Still, it must have made an impression because the minute I got home and cut out a couple of Dresden blades, inspiration struck.  The best thing about this project is this is all stuff I had on hand. 

You'll need:
Rotary cutter and EZ Dresden template 
A small wine glass
A battery operated tealight candle (don't take a chance on a real tealight candle...I'm not sure how safe it is)
An assortment of scraps.

1. Cut 9 blades from scraps using the template at the 4-1/2" line.


2.  Fold each blade in half lengthwise, right sides together, and seam 1/4" across the wide edge.


3.  Pop point out by turning the seam right side out.  Gently push the point out with something that has a pointed end but isn't sharp enough to poke a hole through the fabric (i.e. chopstick, small crochet hook).


4.  Finger press and be sure the seam is centered in the middle of the blade.  Press flat.


5.  Stitch fan blades together by joining the matching points using a scant 1/4" seam.  (Don't worry about the narrower ends so much.)  Do NOT stitch the last blade to the first blade, keep the piece flat.


6.  Press the piece open and trim threads.  Finger press the inner edge in about a 1/4" and then iron.


7.  Edge stitch the inner edge.

8.  Press the entire piece.  Spray starch if you like for extra crispness.

9.  Sew the final seam and press open.  Place the shade on the wine glass, drop the tealight in, and you are done.  I didn't embellish mine but you could easily trim the top edge with rick-rack or whatever tickles your fancy. 

(Just noticed I was a little hap hazard putting the shade on the wine glass for the picture.  It does sit straight on the glass...but I was distracted by an Andy Griffith rerun on tv at the time.)

Wednesday, May 9, 2012

Entertainment Center Re-do

Today's blog is by a very special guest blogger...my daughter, who is way smarter and 100 times more talented than her poor old dyed hair mother.  

This entertainment center began its journey in the clearance section of Target (priced $65) in Illinois and traveled with me through 5 apartments and 3 boyfriends, before it ended up in me and my husband’s new home in Texas.  It, like me, has been through a lot! 
During our move to Texas, the entertainment center was almost completely destroyed.  The “before” pics are the ones I took as part of our complaint with the movers, who deserve whatever the opposite of a “shout-out” is! 
However, this journey has a happy ending.  We took a sad, old, battered, meant-for-box-TVs entertainment center and turned it into a beautiful, budget-friendly, wine-and-game “entertainment” center. 
The supplies included the following: 
*If you are not using a small wine refridgerator, you can use the Closetmaid 25-cube shoe organizer to fill in the space.   
Some optional steps I took:  
Sanding.  In my case, the piece was original covered in an oak laminate, which I painted black.  I started by sanding (using an orbital sander) off the pieces of black paint that scratched off the surface.  I didn’t sand 100% of the piece, just the places that didn’t feel smooth. 
Priming.  Again, I think this could be optional for most.  The reason I think this is semi-optional is because of 1) the black paint situation I was in and 2) the Olympic paint did GREAT in the areas inside the pieced that did not have black paint and had not been sanded.   
If you have the time, money and patience to prime, then you can use what I used, which was recommended by some pinterest-ing bloggers – Zinsser BIN primer.   Learn from my mistakes and be sure to make like a disco anthem and “shake, shake, shake”.   (Note to self:  Primer should be the consistency of yogurt – not milk!) 
New moulding at the bottom.  Because the movers destroyed the bottom of our entertainment center, I had to add a piece of moulding to hide the damage.  The moulding added a great finishing touch though, so I recommend it! 
If you decide to add new base moulding, then here is what to do.  Trim the base moulding to fit the bottom and attach to entertainment center at the base.  I only put the moulding at the front, but if you decide to go all around, then make sure to cut the corners at an angle (45 degrees) so it fits together.   
I used construction glue and nails to help it stay.   The glue can probably be omitted.   Lastly, I would recommend sinking the nail in the moulding.  I used finishing nails and then a little skinny drill bit piece to help hammer the nails deeper into the wood, so the nails wouldn’t stick out.  After that I then put a little putty over the nail holes, so it ended up looking unblemished! 

Now if start with a piece of furniture that does not have many layers of old paint that is darker than your desired new color or a busted base, here is what to do: 
  1. Put together the shoe organizer according to the directions.  It is actually a quick and painless process!  I think it was less than 30 minutes. 
  2. Plan where you want your shelf to go.  I put the shoe organizer in the entertainment center, then set the shelf on top of the organizer and drew a line under the bottom of the shelf to mark where to drill holes for the shelf support.  (Make sure to remove the organizer for the next steps). However, another (more precise) way to do step 2 would be to measure how tall the shoe organizer is and then measure where to drill your shelf support holes [Symbol] 
  3. Drill new holes for the shelf supports, which are little metal pieces that come with entertainment center.  *Make sure that you do not drill through the wood all the way!  You only want to drill deep enough for the support so the other side of the wood stays smooth. 
  4. Use spackle or wood filler to fill in the old shelf support holes…those are the pre-drilled holes from the factory that let you choose where the shelf goes.  Since I was setting the shelf much lower than they anticipated, you now see why I had to re-drill the holes! 
  5. Trim the panel to size, if needed. 
  6. Prepare to paint by removing knobs, putting down drop cloth or newspapers, and pulling your hair back…trust me, my “frosted” tips were not cute!   
  7. Prime the entire entertainment center and shelf.  Then, wait for recommended drying time (usually about 1 hour).  You can skip step 5, if pay the few extra bucks for paint and primer [Symbol]! 
  8. Paint everything (center, shelf, panel) the desired color.  I did not paint the shoe organizer because it’s a close match to the paint color I chose.  However, you will need to paint the organizer if you choose a different color, which is outside the “white” color group. 
  9. Attach the stemware rack.  It comes with 4 screws that drill into the wood.  Only a screwdriver needed and very quick! 
  10. Reattach the shelf and put the shoe organizer underneath the shelf.   
  11. Attach the paneling by nailing it to the back. 
  12. Step back and admire your work…then add your accessories [Symbol]  the wine bottles, glasses, ice buck, and other little touches will make it look even better! 
I store our board games, puzzles, and a few of our favorite CDs in the bottom cabinet area.  Between the games, music and the wine, it truly became an “entertainment” center! 
BEFORE: 
DURING: 
This step is after sanding.  Note the original finish and the black…and how Lola thinks this is her new play center [Symbol] 
Mid-way through priming. 
AFTER: 

Thursday, April 26, 2012

Taggie Baby Bib

If you have a baby in your life, you know how babies love to chew on tags and nowadays there are a lot of toys and blankets for babies made with pieces of folded ribbon to accommodate that love.  However, toys are thrown and blankets easily dropped so when baby wants that 'taggie', it's usually on the floor or out of reach.  Here's a way to keep the taggie handy and also help catch some of the drool a teething baby generates.


First, find a pattern.  You can either use a bib you already have as a guide or download a pattern off the internet.  (I would provide a link but I forgot where I downloaded this pattern.)

I used 2 complimentary pieces of flannel, both 1/3 yard, and found I can get 4 bibs out it.  Depending on your pattern, that may vary.

Cut the fabric one piece on top of the other, with the RIGHT sides facing, so that you have 2 cut pieces.

Next, cut some ribbon about 3 inches long.  Fold the ribbon in half and pin to one of cut pieces. (I used grosgrain ribbon here but I think babies prefer the smooth ribbon so that's what I'll use from here on out.)

Put both cut pieces together with right sides facing and pin together with the edges even.

Leaving about a 3 inch space on one side (for turning), stitch all the way around the bib using a 1/2" seam.

Notch or cut the rounded edges then turn the bib right side out and press.

 Cut a small square of Velcro and sew to the ends of the bib.   Sew 1/4" all the way around the bib making sure to close the opening you used for turning. 
And there you have it!  A happy little taggie bib for a happy little baby.

Personalized Dollar Tree Travel Mugs


Here's a quick and easy little project for anyone with an embroidery machine.  These dandy little travel mugs can be found at your local Dollar Tree. Yup!  You can buy one of these babies for only a buck!  Super easy and super cute and super cheap (especially if you use fabric scraps you already have on hand).
Using the paper insert that comes with the mug as a template, cut out a stiff heavyweight piece of interfacing to use as a guide and a pattern for future mugs.


 Cut the fabric you want to use as the insert about ¼ inch from the edge of the template.

Fold the edges of the fabric over the template and press.


Remove the template and edge stitch all the way around.

Hoop up the fabric and some stabilizer then embroider.   Press flat.


Insert the fabric and Voila!  Personalized mugs!

 
(Remember to remove inserts before washing the mugs.)                                                  

Tuesday, January 17, 2012

Homemade Laundry Detergent

Oh, my gosh, I love this stuff!  I get so tired of paying exorbitant prices for laundry detergent that is mostly water.  And truth be told, I think that's why the detergent companies have pushed the liquid detergents over the last couple of decades and cut back production on the dry, they make way more money on the liquid.  The homemade stuff is pennies per load and works just as well. 


To make:

1 bar of Fels Naptha bar soap, grated
1 cup Borax
1 cup Arm & Hammer washing soda
1/2 cup baking soda

Grate the Fels Naptha with a cheese grater, then add the rest of the ingredients in a big bowl and stir.

Put about half of the mixture in a blender and grind until the Fels Naptha is a more grain like consistency. 

Transfer to the mixture from the blender to a storage container (mine is an old plastic Folgers can) and then grind up the rest of the mixture.


By the way, that's not my normal blender pitcher in the picture above.  That's an old pickle jar.  (Bonus hint, you can use a mason jar or any old screw top jar that fits on your blender and make your own Magic Bullet.)  I had planned to store my laundry soap in that jar but then my husband dropped a jar of jalapenos in the garage when he was unloading the groceries and I decided since he helps with the laundry quite a bit, I probably ought to stick with something non-breakable. 

For light loads, you only need 1 tablespoon of soap.  For heavier loads, 2 tablespoons.

Because this is low sudsing, you can use it in high efficiency washers.  I have a Fischer-Paykel machine and this worked great in it.  The first load of laundry I did using this contained one very gamey sweatshirt and my favorite sweater that my grandson had spit up all over.  Both came out smelling great and clean as a whistle.

Wine Glass Coasters (or regular coasters with a secret life!)

Oh my!  I've neglected this blog so!  Oh well, that's what a new grandbaby and a whole bunch of other stuff crammedintojustafewmonths will do.  But it's a new year and I'm going to try to do better.  Towards that end, here's an addictive little project that is quick and easy and uses up those fat quarters or fabric scraps you have in your stash.

Supplies:
You’ll need a 4.5” square ruler, a rotary cutter, cutting mat, and assorted fabric of your choice.


For each coaster, you will need 6 squares of fabric.  (The square ruler and the rotary cutter make it easy to cut several squares at once so you can make multiple coasters.)

Take 4 squares, fold each in half, then iron.
You should have 4 halves, and 2 squares. Layout the folded squares, overlapping one end over the next to determine the placement you’d like for your coasters.


With the remaining squares, place them wrong sides together.


Then place your folded squares, on top of the unfolded squares. 
BE SURE YOU GET THE CENTER OF THE FOLDED SQUARES AS CLOSE TOGETHER AS POSSIBLE!  Also be sure that all your fabric lines up evenly on all 4 sides.

 
Sew all the way around with a scant ¼” seam.  (I only use one pin in the center.  You may want to use more.  I’m just lazy.)

Clip the outside corners diagonally.  (Excuse the glare, but you get the idea.)


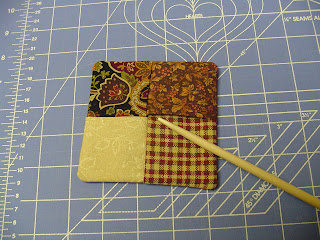
Turn the coaster inside out and if needed, poke the corners out to a point, then press flat.


Slide your wine glass in between the folds and voila, a wine glass coaster.  Or, if you are like me, you just use it as a regular coaster.